This article has permanently moved here from the Natural Frequency Journal, though you can still view a copy of the original at the Internet Archive.
Introduction
Solar shading potential essentially refers to the visualisation of spatial variations in the relative effectiveness of shading. Instead of first desiging a shade and then measuring its effect on a window, it is possible to reverse the process and actually project shading effectiveness out from the window to determine the optimum shape for the shade and even the best location for it.
Whilst this article deals mainly with the basic concepts and some of the mechanics involved, this technique has a wide range of possible applications, many of which not yet discovered or explored.
Shading Projection
The process begins by projecting the window or any object of interest back towards the Sun. This projection can be done through a single plane, a complex curved awning or even an entire city block of surrounding buildings. However, for the purposes of explanation and clarity, we will begin with just a single horizontal plane.
Figure 1 shows an animation illustrating the projection of a simple rectangular window back towards the Sun at a particular time. The intersection of this with the shading plane forms the projected profile of the window. You can imagine that, if this profile were a solid surface of that shape, it would entirely and precisely shade the window at that exact date and time.

We can repeat this process for each hour of the day and see how each profile varies in both location and shape. If you are interested, you can replicate this view using the Solar Projection feature in the Shadow Settings panel in ECOTECT. Simply select the window/object you wish to project and press the Show Projection button. Then, either change the date and time manually or display the daily sun path and interactively drag it around.
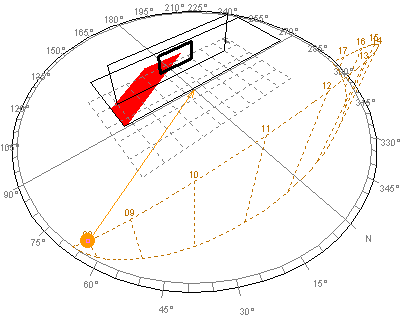

It is quite obvious that, as the Sun travels through the sky from East in the morning to West in the evening, the profile moves from one side of the window to the other. The early morning and late afternoon profiles project quite a way from the window itself. Thus, we can see that there are some parts of the shading plane off to the sides that will only shade the window for one hour per day and, immediately above the window itself, some that shade for up to five or six hours a day.

It may seem obvious that the areas of the shading device immediately above the window are the most important because they provide shade for the longest time. However, time alone is only one part of the whole story.
Solar Radiation Intensity
The relative intensity of solar radiation passing through the shade at each time step must also be considered. There is no point providing shade if the solar radiation is so low as to not warrant it.
All ECOTECT weather data files contain hourly data for both direct beam and diffuse horizontal solar radiation as well as standard temperature, humidity and wind data. It is mainly the direct beam solar radiation that the shading device is protecting against, so it is important to factor variations in this value into the process.

One way to map the intensity of solar radiation is to generate a series of sample points over the window and project them back towards the Sun to find where they intersect the shading plane. Each intersection point can then be coloured to represent the solar radiation intensity at each time step. Figure 5 shows an example of these mapped points, again for each hour from 8am to 5pm over a single day. The top diagram shows a 3D view whilst the bottom diagram shows the shading plane as seen from above in plan view. This way the individual points from each hour can be seen quite clearly.


If this process is repeated not only for each hour of the day, but for each day of the year, it is possible to generate a detailed map of the solar intensity that different parts of the shading plane ‘protect’ the window from. This way, the potential effectiveness of different parts of the shade can be easily visualised.


By linearly interpolating the hourly solar intensity it is possible to map each day in intervals of less than one hour. Similarly, it is possible to map every day of the year or just each week or even each month. It is also possible to map summed, averaged or peak values, depending on the application. The options and potential variations are not limited in any way.
One of the more important features of this method is the ability to map and compare any date/time range. For example, only the three months of summer could be shown, or the full 8 months of a typical UK winter to show collection potential instead of shading potential.
Mapping the Analysis Grid
Instead of using fixed shading geometry, it is also possible to map shading potential over ECOTECT’s analysis grid. This is done using a similar technique, but instead of storing the values as discrete points and relying on our abilities to discern the different colours, data is stored at each grid point which means we can both see the results better and have direct access to the distributed values.
Figure 7 shows the mapped grid results for the same hours and same day as used in Figure 5 above. Figure 8 shows the same date/time period as used in Figure 6.


Using this variant of the technique, the actual spatial mapping is a bit clearer to see. However, there are other important benefits that flow from using the analysis grid.
Important Features
The following are a selection of features specific to this technique or its application that make it a potentially important tool for building designers and engineers.
Contour Mapping
Contour mapping is essentially the drawing of a line that defines the boundary of a specific value within the analysis grid. Combined with the ability to clip the grid to a minimum value, this allows the detailed shape of a shade required to provide a specific level of protection can not only be visualised, but physically measured from the model.

Moreover, as the grid’s clipping value can be interactively updated, it is possible to animate in close to real time the shading extents required for changing protection levels. Figure 10 shows a clear example of this, with huge variations in the shading shape required to ensure no more than 75, 150, 250 and 500 Watts/m2 of incident gain on the protected window. Each of these shading shapes can be easily converted into actual geometry and subjected to other kinds of analysis for multi-parameter or robustness testing.


Stored Values
The ability to store and access this type of data from within the analysis grid cannot be overstated. Each cell can store cumulative, average, peak or even hit-count values, all of which can be read and written using scripts or detailed output reports and spreadsheets.
Overshadowing and Fixed Obstructions
Another important feature of this technique is its ability to incorporate the effects of site overshadowing and/or additional obstructions other than the specific shading device. Figure 11 shows a simple example of a situation in which an existing obstruction will likely provide additional shading of the window at specific times of the year.
If you are sure that the obstructing building or one at least as big is likely to be there for the life of your project, then there is no point designing in redundant areas within your own shading device. As each ray from the window is tracked through all parts of the model, the effect of the existing obstruction on solar intensity values will be automatically included in the calculation. Figure 12 clearly shows how this additional overshadowing is incorporated into the mapping.

Complex Shading Shapes
As mentioned in the introduction, many of the potential applications of this technique have yet to be explored. The methods used can cope with window, shading and obstruction geometry of any shape or complexity. The examples in Figure 13 show its application in the analysis of optimal roof glazing areas, looking at the location of transparent material to required to encourage winter grass growth at the southern end of football stadia.


The Cellular Method Extension
Eran Kaftan of Research & EcoDesign has worked on a similar approach which he terms the Cellular Method. His work is extremely interesting in that it looks beyond just the mapping of solar intensity and tries to consider also the heating, cooling and comfort requirements of the spaces behind each window. This yeilds an extra layer of mapping information showing the shading requirement, which can then be used to weight different parts of the shade.
Collaboration with the author of this article has produced a simple plug-in for ECOTECT that incorporates some of Eran’s work. This plugin is currently available only from Research & EcoDesign.
Conclusion
The mapping of solar shading potential can take some time to understand and apply successfully. However, tools such as these are becoming increasingly important in the design of high-performance and energy efficient buildings. No longer can designers rely on simple rules of thumb and common practice in the design of shading devices - the long-term impacts of inadequate design are simply too high.
Click here to comment on this page.